Monday, June 30, 2008

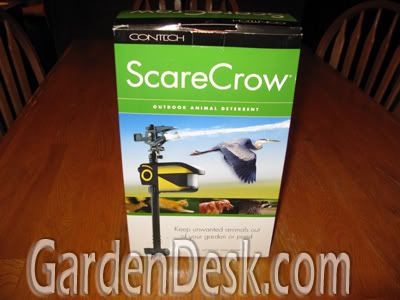
Contech Scarecrow; many uses in the garden!

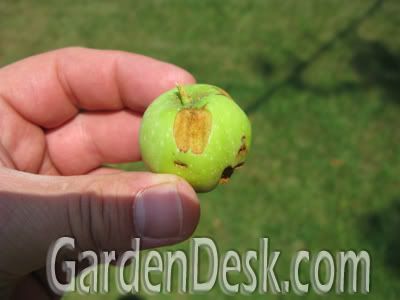
My previous post was partly about all of the animal pest problems I have here in rural Kentucky. Although I didn't know it yet, as I was writing that post my newest animal problem was beginning. Squirrels are stealing my apples! I surprised one sitting in the apple tree and while running away, he dropped this apple from his mouth:

My previous post was also partly about my new garden gadget, the Scarecrow from Contech. This got me thinking that I remember seeing something on their website called SquirrelStop. Contech has many neat products but SquirrelStop is a bird feeder that spins rapidly when a Squirrel hangs from it. It would be pretty funny to see a surprised and dizzy squirrel get spun off of a bird feeder. In my case the Squirrel Stop would not help. How could I keep the squirrels from eating my apples?

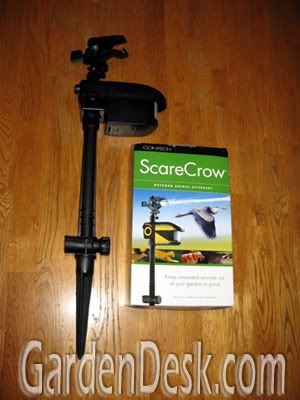
Of course my answer was right in front of me. I was going to wait and use the Scarecrow water sprayer to defend my corn but why not try it out on the Squirrels first? They had already eaten almost all of the apples in the tree closest to the woods, but they haven't touched the next tree yet. I set up the Contech Scarecrow next to that tree but couldn't wait to see if it worked. My daughters were picking tomatoes in the garden so I called them over to the apple tree.

It works!

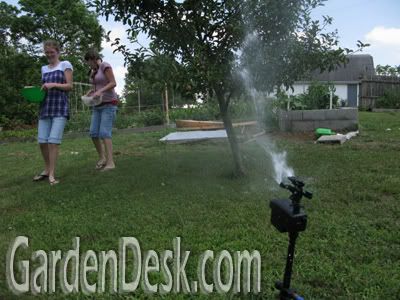
This is a fun gadget. The apple tree limbs blowing in the breeze do not set it off so I guess it isn't a simple motion detector. It seems to only go off if a living thing approaches. It nearly knocked a poor sparrow to the ground! The range of the detector is pretty far as well. It "saw" me working in the garden 50 feet away. The spray doesn't shoot that far but the noise would probably scare animals away even before they get wet. You can also set the radius on how much it sprays. I've got it trained just on the apple trees, but you could make it spray nearly 360 degrees. If I got one more of these I could probably guard my whole garden. Cool!

Saturday, June 28, 2008

Persistence; A Gardener's Best Attribute

Things don't always go as planned in the garden. This is particularly noticeable in the vegetable garden since the goal with each plant is to produce food. If the food is never eaten, that particular planting failed. Problems can range from weather issues to plant disease to pest damage. That is my common problem. Last year, a groundhog ate practically everything. What he didn't destroy the raccoons got.

What can a gardener do about these problems? Be persistent!

Growing corn has been an area where I have needed persistence for years. Raccoons have been my Nemesis here. Last year I devised a plan to beat them but when it came time to build my fence, I failed to get it done.

This year I vowed to build that fence and started the corn in soil blocks indoors. Things were progressing well until it came time to harden them off. I took the two trays of my Bicolor Mirai Corn soil block seedlings outside. All was well until we received the biggest downpour in history! It rained three inches in a hour and the soil blocks were ruined!

Instead of soil blocks, I now had a tray of soupy soil with corn plants jutting out of it. It would be impossible to separate the corn plants without severely disturbing the roots. To make matters worse, I was behind schedule on my garden expansion. I didn't even have the corn area ready for planting yet.

Instead of giving up and throwing the trays out, I decided to once again be persistent. I quickly built a new raised bed, let the corn trays dry out, did my best to separate the corn plants, planted them in the new bed and crossed my fingers.

To my surprise, they are now doing great!

Don't they look great? Oh but I still haven't built the fence and I can see the raccoons watching from the edge of the yard rubbing their little paws together in anticipation. What can I do now?

Building a fence would still be a good idea, but I may be able to get by with a little help from my friends at Contech. I now have a Contech Scarecrow that will be able to guard my precious Mirai Corn when it matures.

This is a really neat product. It is a high powered water sprayer with a sensor that detects when animals come near. Just when the hungry raccoon has its eyes on my corn it will get zapped with a noisy blast of water! I'm sure it will work great. I've already tried it out on my children and I got pretty wet setting it up too.

I will write an entire post about it soon since it is such a cool garden gadget. I sure hope it helps me finally get some good home grown corn.

Persistence is the name of the game.

Tuesday, June 24, 2008

Loads of Birthday Tomatoes!

Last year my goal was to have the first ripe tomato by my birthday, June 24th and I had this small tomato to celebrate with:

My actual first ripe tomato last year was June 15th and the birthday one was only the fourth or fifth tomato.

This year's early tomato production has been even better! My first ripe tomato was on June 5th, and today on my birthday we have these:

A whole windowsill full of garden fresh tomatoes!My daughters and I have decided to count how many tomatoes we pick over the entire season. So far we are at 40! The most recent ones are Orange Blossom Tomatoes. They are larger than the early girl variety and much larger than the 4th of July tomatoes.

They are delicious, a great birthday tomato! They are very meaty and flavorful. This year's garden birthday present will be orange blossom BLTs - colorful, delicious and salmonella free!

Sunday, June 22, 2008

Potato Plants to the top of the Garbage Can

There seems to be more interest in growing potatoes in a garbage can this year. I have seen several garden bloggers doing it. I don't remember them all, but my friends Tracy at Outside and Gina at My Skinny Garden both have good starts of potatoes in a can growing.

I am very pleased with the progress of my can-o-taters so far. The plants have reached the top of the can.

It has been easier this year because I had another can of good compost, peat and soil ready ahead of time. Last year I was always scrounging for some good growing medium. Soon I will add the rest of the soil mix and the can will be completely full. It will be good timing because the potato plants are beginning to bloom.

With this method, it is hard to rob the plant of "new" potatoes early in the season like I do with other planting methods.

With the garbage can potato method, I'll wait for the plants to die back, dump the can over and harvest a whole lot of spuds!

After the can is full of soil, the only thing for me to do for the rest of the summer is to be sure they stay well watered. Then its time for baked potatoes, mashed potatoes, home made french fries, scalloped potatoes, potatoes au gratin, hash brown potatoes .....

Monday, June 16, 2008

Intercropping and Succession Planting - Keys to Square Foot Gardening

I use raised beds for the vegetable garden instead of rows, and practice many Square Foot gardening techniques. I continue to expand the number of beds I grow in, but the best way to get more vegetables out of a small garden is by intercropping and succession planting.

Intercropping, or Interplanting is the practice of growing different kinds of vegetables together. Typically they have different growth patterns and therefore don't compete with one another. One example of this in my garden is that I plant lettuce and tomatoes together in the same bed. Tomatoes are planted 2 feet or more apart because they need two feet of space when they are mature. At time of transplant however, they only need about six inches of space. If I only planted tomatoes in that bed, there would be a lot of unused space for at least six weeks. By planting salad crops in that space I get maximum harvest from that space. The lettuce is harvested before the tomato plants require the space. I do the same thing with tomatoes and onions.

Succession planting is similar in that when you harvest something, you immediately plant something else in that spot. It can be the same thing or a different vegetable. In one bed, I plant Spring broccoli followed by Summer green beans followed again by Fall Brassicas. I also use beans in succession planting with lettuce and spinach. In my lettuce/tomato Intercropping example you don't succession plant after the lettuce because the tomatoes will be ready to use that space by then. This is the fundamental difference between Interplanting and Succession planting.

Sometimes I use a combination of both techniques as I do in my pea beds. In early spring I plant peas on the trellis and lettuce in the front. In one bed, I harvest some of the lettuce and plant bush cucumbers in their place. Later I harvest the rest of the lettuce allowing more room for the cucumbers (intercropping). I also plant vining cukes by the trellis after the peas are harvested (succession planting).

In the other pea bed, I also plant lettuce in front. I harvest the leaves over and over for my salads and they keep growing back. Eventually when the hot weather decides to stick around and the lettuce gets bitter, I remove all of the plants to the compost pile and plant bush bean seeds there. The peas remain on the trellis for several more weeks. The only caution here is that you have to chart where you put everything if you succession plant with seeds. You also have to remember to warn your kids friends not to step on the new bean seedlings while picking peas!

Perhaps the best example of using both techniques simultaneously is with the trellis in this pea bed. Right now I am enjoying the last of the peas on the trellis.

The heat is starting to take its toll on the pea vines and production is beginning to wane. A week or two before I remove the pea vines I plant pole bean plants right along side the peas. Remember the beans that I started in the soil blocks?

They are of nice size now so it is time to plant them. It looks funny planting them right in with the mature pea vines but soon the peas will be gone and the beans can take over the entire trellis. See the small bean plants tucked in amongst the peas?

Soon I will take all of the pea vines out and put them on the compost heap. That reminds me of a very important part of succession planting. When you start the next planting, be sure to add a generous supply of compost or organic fertilizer to re-energize the soil. Growing many plants in the same space uses up a lot of nutrients. That is okay if you concentrate on feeding the soil instead of the plants - another important key to organic gardening. Growing in raised beds and square foot gardening makes this easier too since you don't have to spread compost or fertilizer over a whole field.

I will post about the pea/bean transition again later to show you how the same trellis can serve multiple needs in the same season. Happy gardening!

Saturday, June 14, 2008

Gardening, Children and Friends; A Winning Combination!

I have always loved seeing my daughters enjoying the garden. Recently they had some friends over and they all joined in the act. They picked and ate all of the ripe strawberries before I could even get the camera. Then they set out to pick the peas.

These were Maestro Peas and they were magnificent with eight to ten peas per pod!

After the girls filled their bowls with these plump pea pods, they retreated to their treehouse to shell the peas.

They had so much fun with it. They did not consider it work.

They were surprised how many peas they had ready for the kitchen by the time they finished.

We cooked them for supper that night and we all thought they were delicious except for one friend, and that was only because she didn't even try them!

It was really fun for me to watch them all enjoying the harvest!

Thursday, June 5, 2008

First Ripe Tomato on June 5th!

The name of the tomato variety is July 4th, but here it can be called June 5th!

Only one is fully red but I guess it still counts as having a ripe tomato on June 5th.

My goal was to have a ripe tomato by June 1st but I didn't quite make it. Last year's first tomato was on June 15th so I beat that mark by 10 days. By June 15th I think we'll have lots of tomatoes ready this year. Last year's first was an Early Girl tomato. This year the Early Girls, New Girl tomatoes, and Orange Blossom tomatoes are all doing well and should be ripe in a week or two.

The first variety of course is the 4th of July tomato. In a week we should have many of them but for today we just have this one little guy.

Not big enough for a tomato sandwich but I bet it will still be delicious! After all it is home grown and organic! Yum!

Tuesday, June 3, 2008

Soil Blocks to the Rescue!

We haven't had much rain in the past month so it has been pretty difficult to get new seeds planted out in the garden to germinate. I have had to water the bush bean area everyday to keep the top of the soil from crusting over. On days that I miss, the top layer of the soil dries out and the seeds can't break through. While dealing with this frustration I got to thinking, there has to be a better way.

What about my soil block maker?!

Beans and corn are two vegetables not usually grown indoors and transplanted because they have very delicate roots that don't take well to transplanting. Squeezing the seedlings out of a cell pack or wrestling them out of pots can be harmful to them. With soil blocks the transplant shock should be minimal or nonexistent!

A week or so ago I set out making blocks and planting seeds for my pole beans and my Mirai 301BC corn.

If you don't know what a soil block is, I wrote about them earlier this year. I got mine from Johnny's Selected Seeds. If you want to know more about soil block makers, Johnny's has a great PDF file explaining them better. Also, Jason, who has commented on this blog before, has a whole website devoted to soil blocks. He calls them potting blocks and his site is pottingblocks.com.

What will make soil blocks great for beans and corn is that there are no pots to remove, so the roots won't be disturbed. I can gently place the block in a small hole the garden and cover up around the block with garden soil.

The major difference in dealing with soil blocks under lights is the way you water them. As I have stated before, I am a big fan of bottom watering seedlings under grow lights. With the blocks, you have to spray from above daily to assure that the blocks don't dry out. After the plant roots have taken over the block, you can then lightly pour water into the block.

Here are the pole been seeds popping through the soil block:

Every seed germinated since I have better control over their conditions than if planted directly outside.

Here are the baby corn sprouts poking through on their first day:

What makes corn so difficult to grow indoors is that the taproots grow very quickly. Look at it sticking out of the soil block on day two after germinating!

These corn plants are already outside hardening off and will go into the garden very soon. The key is to transplant them only about a week after they sprout inside in the soil block.

So there you have it - soil blocks to the rescue with guaranteed germination. This morning the McCaslan pole beans were transplanted into the garden and the corn and other pole beans are waiting for tonight. Living in Kentucky, I have to grow Kentucky Wonder Pole Beans of course. My third pole bean variety is the crazy Chinese Red Noodle Bean that grows 18" pods! More on that later....

Monday, June 2, 2008

Ripe Tomatoes by June 1st?

One of my goals in the garden this year was to have red ripe tomatoes by June 1st! I planted the seeds on Valentine's Day, potted them up inside multiple times, warmed the outside tomato bed with black plastic, and planted the tomato plants outside in Early April under a clear plastic tent.

June 1st has now come and gone, so its time for an update. Here are some pictures taken on May 31st:

They are not red yet, despite all of my hard work. It was an unseasonably cold May here. Even giving the plants a huge head start did not overcome the weather. I almost lost the plant on the end when we had consecutive nights of 26 degree lows. Notice how much smaller it is then the others.

Even the main season tomatoes that I planted two weeks ago have not grown a bit. I may still be able to beat last year's early tomato mark of June 15th. One thing is for sure - when I do get early ripe tomatoes, there will be a lot of them! Last year I only had two extra early plants. This year I have 12 plants of 5 different varieties. You can track both year's early tomato progress with this Label.

So am I disappointed that I didn't eat organic garden fresh ripe tomatoes yesterday? Not really. The fun is more in the journey than in the destination. There are two reasons that I am not disappointed. The first is that I still will have loads of ripe tomatoes a full month before my friends and neighbors.

The 2nd reason it didn't bother me that I couldn't enjoy red ripe tomatoes from the garden this weekend is because my family enjoyed red ripe strawberries from the garden instead!

The strawberry defense plan worked! nothing got in to eat the berries except the slugs, and now I have a great way to get rid of them too! Stay tuned for a future post about my new SlugsAway which is a little battery-operated electric fence. Weird but cool!

As for now however, I'm going to enjoy the strawberry harvest and hope that the tomatoes are ripe before June 15th.

Happy June everyone!

GardenDesk   © 2008. Template Recipes by Emporium Digital

TOP