Tuesday, April 28, 2009

Repelling Raccoons - 3 ways to keep raccoons out of your corn!

We have many raccoons that frequent our yard and garden. They eat the leftover cat food on the back deck just waiting until that magical night when the sweet corn is ready!

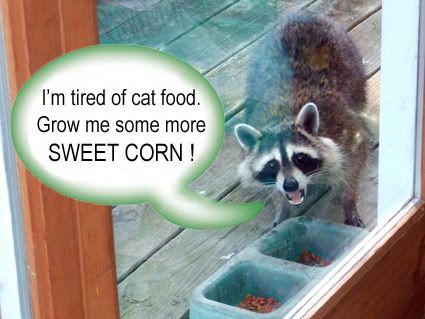
Then they party until every last kernel is gone!

So what can I do to repel those rascally raccoons? There are three ways for me and you to rid raccoons from our gardens.

1. Erect an electric fence. An electric fence is the only sure way to keep raccoons out, but that involves too much work and expense for me.

2. Use a "floppy fence". Last year I began creating this, but didn't finish in time. I still think it is a good idea though. Basically you fence in your garden or a portion of your garden using your favorite standard fence. I only put the fence around a small corn patch last year. The trick to the "floppy fence" as outlined in Jeff Cox's 100 Greatest Garden Ideas, is to attach a roll of chicken wire to the top of the fence like this:


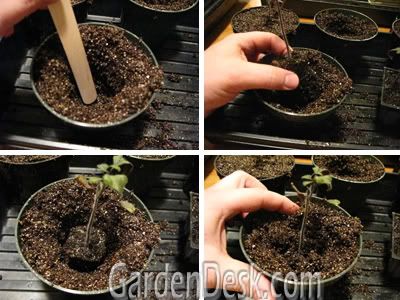
The chicken wire is fastened only at the bottom to the top of the fence. It stays floppy at the top with no support. When a raccoon attempts to climb it, it folds down on him which essentially dumps him off. Allow me to demonstrate with my daughters stuffed animal:

The raccoon climbs the fence and reaches the chicken wire. When it continues up the chicken wire, its own weight causes the wire to bend down over it.

No corn for that leopard, raccoon! When I wrote about this last year, some readers commented that this would also work to keep cats out of your garden. If cats are your problem, you could use netting instead of chicken wire.

I believe this might work and I love the 100 Greatest Garden Ideas book, but even this strategy is a bit too much work for me this year. Instead, this year I will be trying my 3rd way to repel raccoons, which I learned from another one of my favorite books, Carrots Love Tomatoes: Secrets of Companion Planting for Successful Gardening. So what's the trick?

Plant a virtual fence with cucumbers! 

Cucumber Raccoon 1 

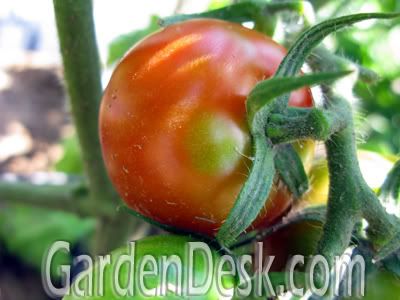
Dozens of vining cucumber plants will completely surround my corn patch. According to Carrots Love Tomatoes, raccoons can't stand cucumbers. They don't like the smell of them, and they don't like walking across the prickly vines. I'm not sure if it will work but I agree with many other things from that great book. I have started many cucumber plants of five different varieties. Not only will I have an almost infinite supply of cukes, but hopefully I'll also get some of this:

Mmmmmm! I can't wait for Summer eatin' from the garden!

So what do you think? Will this idea work? What about Jeff Cox's floppy fence? Do you have any other ideas for beating those coons this year?

Maybe I should feed them extra cat food!

Tuesday, April 21, 2009

Raising Chickens; New to GardenDesk!

We finally have baby chicks, so our new adventure in raising chickens has officially begun!

We have never kept any kind of farm animal before but have been gardening for over 20 years now. It seems that raising chickens is a natural extension to vegetable gardening as I've seen many other garden blogs discuss chickens. I suppose it is similar in that just like with vegetable plants, you care for the chickens and then "harvest" the eggs.

Our chicken coop will be located right in front of the garden and next to the greenhouse, so they will actually become part of the garden. We will be able watch them and tend to them while in the garden and it will be easy to supplement their diet with veggies and insects from the garden. I am looking forward to having them as my garden companions.

For now, they are in our garage in the homemade brooder that my father-in-law built:

We have 17 chicks in all but there are 5 breeds represented. Among them are Buff Orpington, Silver Laced Wyondotte, Dominiques, Black Austrolorp, and some Polish Crested. I don't know how many we will be keeping. Some of them will join the flock that Renee's parents have. For now we are enjoying them all and watching them change and grow daily in the brooder.

Since we really don't know what we're doing yet, we have been reading a lot about raising chickens. Whenever I start something new, I like to find the great books on the subject. I go to several libraries and check out as many books as I can on the subject - usually twenty books or more. Then we browse through each book and pick out our favorites. Then I read those books in their entirety and usually buy two or three of them for future reference. To begin our chicken adventure, I found many books and have selected these four as my favorites:

The book that most people would recommend is Storey's Guide to Raising Chickens. I agree that it is a wealth of information and I will be buying it.

Another great book for me right now is Chicken Coops: 45 Building Plans for Housing Your Flock since I still have to build our coop. It has lots of great ideas.

My third selection is Keeping Chickens: The Essential Guide because it has good information and beautiful pictures of the chickens and different coop ideas. This is helpful to our family because we are not yet familiar with even how our adult chickens will look.

Last but not least, I am enjoying Barnyard in Your Backyard . It is great because it is written as a guide for beginners. It also covers raising other small animals including rabbits. Rabbits will be our next addition, so I will be buying this book as well.

I love the combination of learning by doing at the same time you learn what to do from books. We will be learning how to raise chickens successfully in this way and we are pretty excited. Hopefully I will have the coop and yard built soon to show you.

There has been much going on in the garden too, which I am behind on posting about. Get ready for rapid-fire posts as the gardening season (and chicken season) is now moving into high gear!

Happy Gardening!

- Marc

Sunday, April 12, 2009

Happy Easter in the Garden!

Spring has sprung, The garden is blooming and My Savior Lives! Oh what a wonderful day!

HappyEaster1

HappyEaster2

Happy Easter everyone!

Thursday, April 9, 2009

The worms are multiplying - Babies!

We are really enjoying our GardensAlive Worm Composting System. We have only had it a month but the worms have more than doubled already! If you want to see what the worm bin looks like, I showed several pictures of it on my last worm post.

My daughter has had a favorite kids book for years called Diary of a Worm. Now that we have been able to watch worms up close for a month, we understand the book a lot better. Now, it is pretty funny to us. What a great little book. For example, the instructions in setting up the bin had us put several sheets of wet newspaper as the very top layer of the bin.  Diary of a Worm begins with advice from a mother worm to her son. One thing she tells him is "Never bother Daddy when he's eating the newspaper."

As it turns at, that is so true. The worms love to eat newspaper! Look at what those three layers of newspaper look like after one month:

They also like to get up above the newspaper, between it and the plastic lid - so we added more moist newspaper.

Today we discovered the coolest thing of all. The worms not only like to eat newspaper and crawl between it and the lid, but they like to do other things there as well.

Look at all the babies! There are at least six or seven in this picture. They are so small that we would never have seen them without the newspaper as a backdrop.Here's a closeup of the above picture:

These baby worms are small but they are a lot longer than I would have expected. Below is a different picture. Notice that one baby is snuggled up next to an adult and another baby is a little to the right. It almost looks like a mom and her babies, doesn't it?

Did I just hear you say "aw, how cute"? If so, did you ever think you would think worms were cute?

I tell you, we are having much more fun with our worm bin than we expected. It's really easy to keep it going since the bin is right in our living space. We have already expanded to the 2nd tray. If you want to see how the bin is put together, my first worm post shows it in detail. Also in that post, I show some other styles of indoor worm bins like the famous Can-O-Worms.

I'm sure those other worm systems work well too, but we are very satisfied with our Gardens Alive bin. They still have their spring Internet coupon going for the worm bin or any of their products. It is $20 Off Any $40 Purchase, a pretty good deal, don't you think?

We are so new at keeping worms that it still seems odd to call it vermicomposting. That is what I like to call it though, because the whole reason for raising these worms is to be able to use the ultra-rich compost for the garden that they create. I first found out about vermicomposting from a garden blog, but I don't remember which one.

If you are a garden blogger and have ever written about raising worms, please let me know. Include the url to your post, label or category too if you can. We'd also like to hear from you if you've ever kept worms even if you haven't written about them. I want to learn all I can about this and tell as many gardener's as I can too.

Keeping worms is so easy and fun, every serious gardener should consider it! Please comment if you agree with me or even if you have questions.

Thanks,

Marc

Tuesday, April 7, 2009

Onions - a - Plenty

Recently Renee and I got to transplant our onion plants outside in two of our raised beds.

We are growing two different onion plants this year. Walla Walla is a yellow skinned large sweet onion and Superstar is our large mild white onion. Both are supposed to do well even in the north.

We will be planting various onion sets as well when we plant out the tomatoes and beans. We also have two types of leeks still growing inside under the lights (Carentan and Giant Musselburgh). To round out the Allium family, we have potato onions and several types of garlic that we planted in the fall. The large onion bed is right next to one of the garlic beds.

The garlic is growing very well.

If it weren't for all of these Alliums, the vegetable garden would still be pretty empty. Soon they will be joined by peas lettuce and cabbage. Then later comes the many warm season veggies. I can hardly wait!

Monday, April 6, 2009

Early Tomatoes Progressing with Transplanting

Several people have been asking me about the status of my extra-early tomatoes. I also have received questions about how big they get inside before I move them out. I have been a bit less organized this year so not all of the early tomatoes were planted at the same time. Currently I have some in all three of the first stages. First, I think it would be helpful to explain the process that I take all of my early tomato plants through with this picture montage:

I start the seeds in plastic cell packs by sowing two or three seeds in each cell and then cut out all but the best looking plant. As soon as the plants get their first set of true leaves (not counting the seed leaves) I transplant them to 4 inch peat pots or sometimes newspaper pots. When they get about six inches tall I transplant them to CD spindle covers and then again later to patio planters. Each time I re-pot them I bury the stem all the way up to the leaves to encourage new roots (visible in above pictures 5 and 6).

Why do I transplant so many times and so often? This is the key factor in keeping the plants growing at a fast pace. The plants will stop growing if they run out of root room. If a plant stops growing, it doesn't necessarily hurt the plant, but my goal is to get them to ripen as early as possible. Here is a picture that illustrates this in an amazing way:

What's so amazing? The plants on the left are the exact same age as the one on the right. The only difference is that the one on the right was potted-up about two weeks earlier. The ones on the left stayed in their original cell pack. When the roots ran out of room, their growth was retarded. That is why you must transplant often to keep the plants growing.

I have tried simply starting the seeds in larger containers as well. This works better than allowing the tomato plants to become stunted, but you lose the benefit of planting deeper with each transplant. The plants just get taller and spindly and fall over. The root system is not as strong either because when you bury the stem during transplanting, new roots from from that previous stem. Extra bonus!

This year I am skipping the peat pot stage and transplanting from the cell packs to a 4 inch nursery pot. Here is a recent flat of them:

 Those are my 4th of July, Orange Blossom, and Early Girl seedlings. I have found a method for quick and easy transplanting too. I fill the new pot with new soil mix, leaving the center open. I then can simply remove the plant and root plug from the cell pack and drop it in - filling in the dirt around it and around the stem until the new container is full. This smaller montage shows what I mean:


I'm not sure if I'm on target to get ripe tomatoes before June 1st or not. Last year I managed to get my first ripe tomato on June 5th. I hope to beat that this year, but I'm not very confident of that. We'll see. My favorite old gardening book that I often speak about is  The New Victory Garden by Bob Thompson.

In that book, Thompson outlines this process of growing early tomatoes and he gets ripe tomatoes in New England by June 1st! Maybe I need to study the book again to make sure I have the plan right from here on out.

It is very cold here this week, but I can easily imagine a warm May 31st were I visit the garden early in the morning to find this:

That was last year's first tomato. Can't you just taste it? I can hardly wait!

GardenDesk   © 2008. Template Recipes by Emporium Digital

TOP