Friday, February 27, 2009

Gardening Themed Fortune Cookie?

My family and I love to eat Chinese food, and since there is a new Chinese take-out restaurant in our town, we've been eating it more than we probably should. Of course, the kid in me always likes getting the fortune cookie after stuffing myself.

Most of the time I don't pay much attention to the actual fortune, but this time I did a double-take!

It says "Your present plants are going to succeed."

Wow, that is so great! How did it know that I've already started my extra-early tomato plants under lights?

That has to be a typo, right? It makes me think - wouldn't it be a great idea to have fortune cookies for gardeners? Think of all the great advice they could give. Maybe I got the first fortune cookie for gardeners. Or maybe it is supposed to read "Your present plans are going to succeed." I am planning quite a bit for the garden this year, so I'd take that as well.

I guess this means the year ahead will be a great one. My plants or my plans will succeed!

This fortune can be for all of you as well. So make plans and grow plants; they're sure to succeed! Hey, the cookie says so. :)

Thursday, February 26, 2009

A Political Statement; Rare on Garden Desk!

I have always stayed away from discussing politics on this blog, but I just can't keep quiet with this. When it comes to public office, how does one know that he has reached true success? It certainly isn't that every constituent agrees with his or her positions. Can you consider someone successful if he gets elected to his State Senate? How about if he is elected to the United States Senate? Could the true measure of political success be attaining the office of the President of the United States? Barack Obama has achieved all of these political positions but I'm here to tell you that even becoming President is not his biggest honor. What marks his success even more than becoming president? I am here to report that Barack Obama's single biggest honor is.............

BARACK OBAMA IS NOW A CHIA PET!

Introducing the Chia Obama Handmade Decorative Planter!

Everyone needs one of these, don't you think? And since nothing with Obama is ever small or simple, there's not just one Chia Obama pose - there's two! If the above "Determined" look doesn't suit you, also available is the Chia Obama "Happy" pose!

President Barak Obama. Love 'em or hate 'em, you have to agree that he has reached the pinnacle of stardom. There is no greater honor than becoming a Chia!

Cha Cha Cha Chia!

Tuesday, February 24, 2009

I'm ready for the worms!

12 years ago I wrote a newspaper article about raising worms as part of my Master Gardener certification. I had the privilege of interviewing a local expert on worm composting who taught me that the proper term is vermicomposting. Visiting her at her house I discovered that she had many "worm composting pits" in her back yard. What surprised me the most however, was that she also had a can-o-wormsin her kitchen! Ever since, I have wanted to buy my own can-o-worms. The Can-O-Wormsis basically a multi-tray composting system raised up on legs with a tap on the front to drain excess water as "worm tea".

Since this popular unit costs over a hundred dollars, I was never able to get one.

Last year, I finally decided to try my hand at vermicomposting in a makeshift plastic bin. It was fun and worked for a little while. My bin didn't provide adequate air for them and since it was sitting on the basement floor, ants invaded the bin. I made all sorts of mistakes and the worm farm failed.

This year, my wife said that she would like to try again if we could find a cheaper alternative to the Can-o-Worms.

I had my eye on this unit:

The 4 Tray Green Gusanito Wormswrangler Worm Farm Bin. It was available for $68.95 - much less than the can-o-worms.

Meanwhile, my wife found the Worm Composting System from Gardens Alive which also had four trays and a spout. It was $99 but they offer an online $20 off coupon. That got it close to the Gusanito system price. Since we already love and trust Gardens Alive, that's the one we bought. Besides, I had some other organic products to order from them. I don't think I could keep my garden organic without Gardens Alive's great products. By the way, if you are interested in the $20 coupon, you can get it here: $20 Off Any $40 Purchase

Sorry, I'm getting off topic a little here. That was the introduction to my post!
Here's the real post:

Our new Worm Factory has arrived and the worms will be here any day! It only took three days to get here after we ordered it. We quickly opened it up and spread out the pieces.

Our cats were very curious about it. Remember Our cats Macy and Maggie? They show up in our pictures from time to time. Hey cats, get off the table!

We began putting the worm bin together. I had to screw on the legs and attach the tea spigot.

Then came time to test the spigot.

It works! Although next time we use it, the water won't be that clear! All done except for the residents of the worm factory. It also came with paper bedding and a block of coir to add to the bedding. We have to start with only one tray and stack new ones up as the worms and their bedding/compost fill up the first tray.

To keep the basement ants from attacking again, and to prevent neglect, we will be putting this attractive new vermicomposter right next to our table and hutch in the kitchen dining room.

Weird, huh? We are excited. Does this seem strange to you, or are you a vermicomposter too? It will provide wonderful compost as well as conversation when visitors are here!

Anything to keep us thinking of Spring!

Sunday, February 22, 2009

Step by Step How to build a Cold Frame

Last year I posted about the new Cold Frame that I built and I was asked to write a more detailed how-to post. I bought the materials to make another one, but never found time to build it... until now.

Last year's cold frame looked like this:

It was basically a 4'x4' cold frame built by following the plans from one of my favorite books called The New Victory Garden by Bob Thompson.

The new cold frame I built was created in basically the same way but instead of the traditional 48" in depth, I made it 40" so it will fit the raised bed in my new greenhouse. That's the beauty of building your own cold frame - you can tailor make it to fit your needs.

The New Victory Garden was written way back in 1987. It was the first vegetable gardening book that I bought and I learned a whole lot from it! It truly was instrumental in my obsession with veggie gardening. There are many great things in the book including easy to follow plans for how to make a coldframe. I will attempt to explain the steps involved in the remainder of this post, but I'm sure I won't be able to do it as well as Thomson. Let's start with the materials needed:

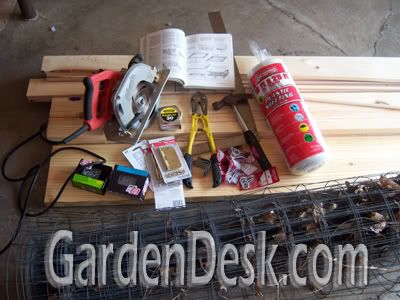
All you need are some tools, exterior nails or screws, two hinges, a 4' piece of good plastic sheeting, 3 - 8' 2x6 or 2x8 untreated boards, two 8' 2x4s, two 8'a 4' piece of wooden dowel, 10 feet of 1x3" lumber and some furring strips. I'm sure I missed something in that list, but we will go over each step below:

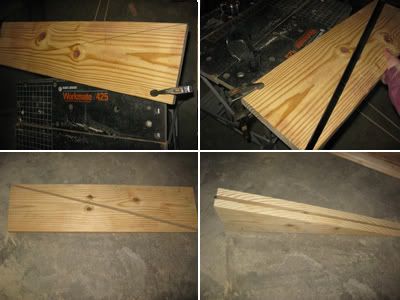
Begin by cutting the 8' 2x8s in half to create six 4' boards:

The boards will basically be arranged like the last panel of the above picture. 4 boards make a box for the bottom layer. One more board goes on top in the back, and the last board gets cut diagonally for the sides.

This is probably the most difficult part of the whole process. Draw a line from one corner to the opposite corner and cut down the line. The way I accomplished this was to clamp it to my table. After the cut is made, you should have two identical diagonal boards.

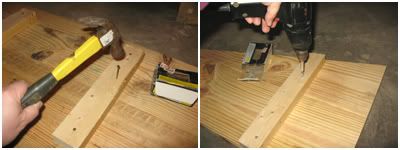
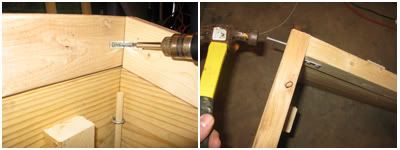
Next, attach each diagonal piece to one of the side boards with small pieces of the 1x3s. Do the same with the two 4' boards for the back. You can use exterior 3" screws or galvanized nails. I used some of each.

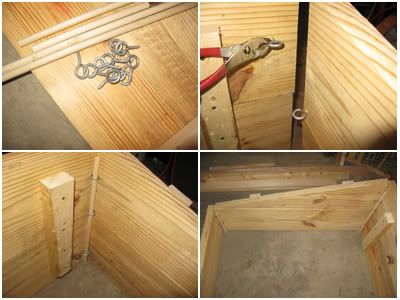
Now that the back and sides have been created, we have to attach them. This is one of my favorite features of the Victory Garden's plan. If you simply nailed the sides together, you would have to build the frame in place because the entire unit would be too heavy to move. This design allows you to easily take apart the frame to move it around or store it.

Each corner is attached by using galvanize eye screws and wooden dowels. You alternate the eye screws in the corners and then slip the dowels in.

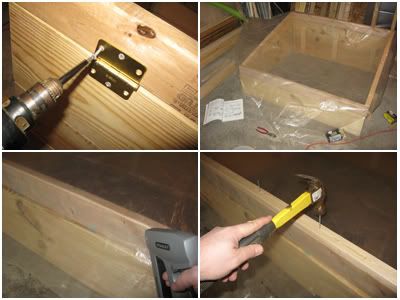
Next you build the lid or top of the frame that will be hinged to the frame using 2x4s. The front and back is made from 4' pieces and the sides from whatever length you are making (this frame needed to be 40" total front to back length, so the side pieces were 37"). The most difficult part of this is that the sides need to be cut at an angle so the lid fits securely. The easiest way to do this is by lining up a straight edge with the boards below.

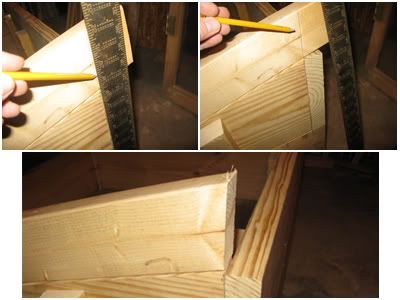
The 4 lid pieces are then attached by nailing through the ends. You might find it easier to use an "L" bracket to line up each corner first.

After the lid is solid, you can attach it to the frame with hinges. Then you can add plastic to the top by stapling it down and nailing furring strips over the plastic.

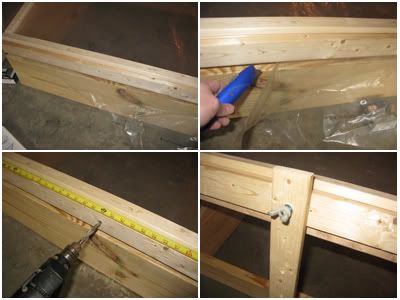
The thicker the plastic sheeting you use, the better. I used 6 mil greenhouse plastic for this one. Last year I just used plastic from the hardware store and it was probably 4 mil. The book calls for wire fence to be put down first before the sheeting is attached. I did this last year, but didn't think it was necessary for this one. If you do use fencing beneath the plastic, use "U" nails to attach it to the top of the lid.

We're almost finished with our new coldframe now! After you've nailed down the furring strips over the edge of the plastic, trim the excess plastic away. Then you need to measure the middle of the front and drill a hole in it. This will be used to slip a carriage bolt through to attach a post that will allow you to vent the frame when needed.

My finished cold frame looked like this:

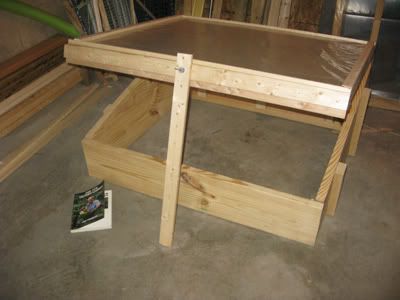
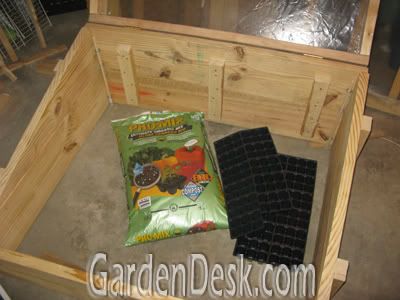
All ready to be taken outside and put in the greenhouse. It will soon house tender young plants to help me get a jump on the growing season. If you want to know more about the uses of a cold frame, see my post on Simple Green Frugal Co-Op or visit the library and get some books about it. There are many books available that include ways to use cold frames for season extension. Among my favorites are Four-Season Harvestby Eliot Coleman, Solar Gardening, Growing Vegetables Year Roundby the Poisson's, Gardening Under Plasticby Bernard Salt, and my new favorite where I got our greenhouse plans from - The 12-Month Gardenerby Jeff Ashton.

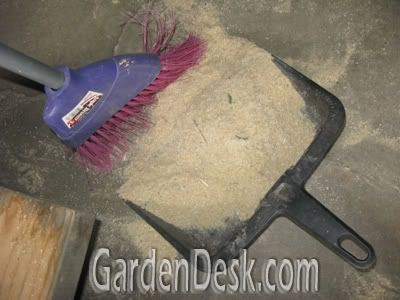
Now I just have to do more seed sowing! Oh, I almost forgot to mention the final step in building a cold frame - sweep up the saw dust and add to your compost pile :)

Thursday, February 19, 2009

Eye Grow: New Fun Gardening toy for kids!

You never know where you might find a fun garden-related item. I usually start looking at all of the garden centers this time of year to try to find a cure for my Spring Fever. Every once in a while you discover something when and where you're not even looking. This happened to me last weekend when my family went to Michael's craft store because my daughter was looking for something to use on her American Girl Doll website. That's where I found these cool little "Eye Grow" plants at Michael's.

The "heads" are actually a nylon mesh filled with soil. The top of head is contains ryegrass seeds that grow to become the hair.

These remind me of the Chia Pets a little, but I like these Eye Grows better. I think they are more fun for kids because they are pretty cheap and very colorful with big cartoon-like eyes. Each one comes with a sticker sheet of mouths so you can design the expression yourself.

I searched the Internet to find out more about them and found nothing. The company listed on the Eye Grow boxes is Sourcing International. When I searched for Sourcing International, all I found is a site about their Grow-A-Head products. Here is one of the pictures from that site, their grow-a-pets:

I've never seen these before. It's strange that they don't mention their Eye Grow products at all. I couldn't find any references to the eye-grow anywhere on the Internet.

I can't wait to start these growing. I am giving some of them to my niece and nephew, but I will post pictures of the ones we keep as soon as their grass hair has grown out. These are perfect for a little Winter gardening fun. A year or so ago, we had fun with the Magic Sproutz secret message plants in a similar way. Come to think of it, I haven't been able to find those again either.

So what do you think about the Eye Grow plants? Has anyone else seen these? Would you buy them if you saw them, or am I just a big kid for thinking they are cool? I'd love to hear your thoughts!

Monday, February 16, 2009

Do Upside Down Tomato Planters Work?

About fifteen years ago, we moved into our first small house. It had a nice little car-port complete with multiple hooks for hanging plants. The whole neighborhood was the same style house and there were so many beautiful flower arrangements hanging from the end of each carport. We followed suit and hung a few baskets of petunias.

I wasn't very excited about it until I saw a house with more than just hanging flowers. They had a hanging strawberry basketand a hanging container full of herbs. That got me thinking about other edibles you could grow in hanging pots, and before long I had a hanging basket of lettuce. Tomatoes were too big to grow in a hanging pot, but I managed to grow one out of the bottom. It worked pretty well and I was able to grow marigolds in the top part.

I never considered using anything other than a traditional hanging basket, but now there are containers on the market that are designed specifically to grow tomatoes from the bottom. I first saw these a couple years ago but resisted the temptation to buy one... until now!

I now have my very own Topsy Turvy Upside-Down Tomato Planter- as seen on TV even. I don't watch much TV and have never seen any commercials for this product. My daughters laughed when I showed them my new Topsy Turvy Tomato planter. They said, "That will go well in your Tomato Playground. It's like the one on the commericial". I guess it really is seen on TV. Some people are drawn to the "As seen on TV" slogan but I usually shy away from products with that claim. So what do I have with my Topsy Turvy Upside Down Tomato Planter (other than a mouthful title)? Will it work? I think it should work fine. It will be a pretty cool novelty addition to my container garden section this year.

It will be great, according to all that is written on the box. Here is the list of positives they cite:

  • Grow delicious & Juicy Tomatoes all Season Long
  • Hangs on Deck, Balcony or Patio (I would add Car-port)
  • Eliminates Weeding, Caging and Staking
  • Can Grow Organic Too! (Always)
  • Also grows other vegetables including Green Bell Peppers, Zucchini, Cucumbers, Eggplant, and more!
  • How it works:

  • Uses gravity as a vertical growing advantage
  • Vertical grow bag heats the plant like a greenhouse so the root system explodes
  • Gravity pulls the water and nutrients directly to the roots
  • It features:

  • Swivel top for easy turning
  • Simple to set up and maintain
  • Uses ordinary potting soil
  • Great for growing your own organic vegetables
  • UV-resistant, durable materials to last for years
  • I didn't make all of that up. It is what is written on the back of the box.

    The Topsy Turvy isn't the only upside down tomato planter on the market. Look at this funny, but pretty cool Hot Pepper Vertical Grow Bag:

    It seems that I am late to this vegetable hanging party. The more research I did, the more I found. The Topsy Tervy people also make a big stand up system called The Upside-down Tomato Garden. Check this out:

    That is really cool - and you can grow flowers in the top part like I did so many years ago with my home-made upside down tomato planter.

    So what's the verdict with these upside down grow bags? I would love to hear from those of you who have tride them before. Do they work? Do they work better than a "normal" patio container? Did you have fun with them, or were they a hassle to deal with? I will be answering all of these questions this season as I experiment with my Topsy Turvy Tomato bag. I think I will also try to make some home-made upside down tomato planters just for fun.

    What do you think? Are they worth a try?

    GardenDesk   © 2008. Template Recipes by Emporium Digital

    TOP